
Sell more with the advanced eCommerce product search by Doofinder on your Odoo website
After importing and indexing, Doofinder uses the received data for product search and filtering, as well as displaying relevant results directly to buyers on the website.
| Availability |
Odoo Online
Odoo.sh
On Premise
|
|---|---|
| Compatibility |
Community
Enterprise
|
| Technical Name | product_data_feed_doofinder |
| Version | 19.0.1.0.0 |
| License | OPL-1 |
| Category | |
| Support | Free 60 days support and 360 days bug-fixing |
Use Case

Jorem ipsum dolor sit amet, consectetur adipiscing elit. Nunc vulputate libero et velit interdum, ac aliquet odio mattis. Class aptent taciti sociosqu ad litora torquent per conubia nostra, per inceptos himenaeos.
Forem ipsum dolor sit amet, consectetur adipiscing elit. Nunc vulputate libero et velit interdum, ac aliquet odio mattis. Class aptent taciti sociosqu ad litora torquent per conubia nostra, per inceptos himenaeos.
Dorem ipsum dolor sit amet, consectetur adipiscing elit. Nunc vulputate libero et velit interdum, ac aliquet odio mattis.
It is a long established fact that a reader will be distracted by the readable content of a page
Korem ipsum dolor sit amet, consectetur adipiscing elit. Nunc vulputate libero et velit interdum, ac aliquet odio mattis. Class aptent taciti sociosqu ad litora torquent per conubia nostra, per inceptos himenaeos.
Korem ipsum dolor sit amet, consectetur adipiscing elit. Nunc vulputate libero et velit interdum, ac aliquet odio mattis.
Odoo App Installation
Upload modules
Upload modules from the ZIP archive to your Odoo hosting, or a GitHub repository connected there.
Place the unzipped modules in your custom add-on directory and restart the Odoo system service.
Update App List
After restarting, activate the Developer Mode, and go to the Apps menu.

Click on Update Apps List to fetch the new modules in the list.
Activate the App
Install the new module, finding it by name and clicking on the Activate button.
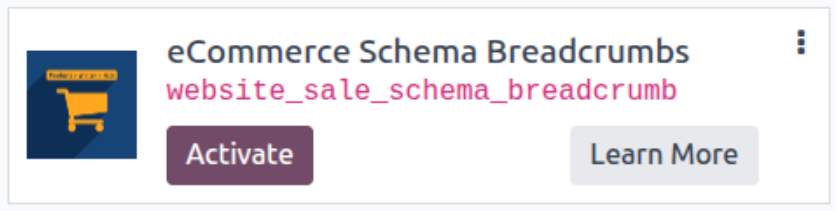
* If you don't see the module, try to remove the default Apps filter from the search bar.
Configuration
Follow the instructions in the module description to complete the installation process and start using the app.
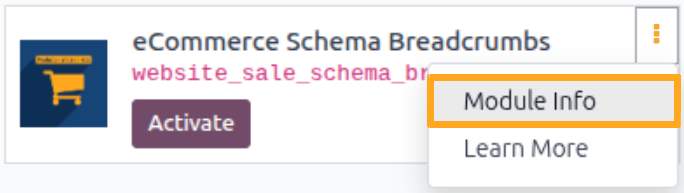

Manual

Getting Data for Doofinder Setup
Before adding the installation script to your website, obtain the store identifier in Doofinder and determine the search zone.
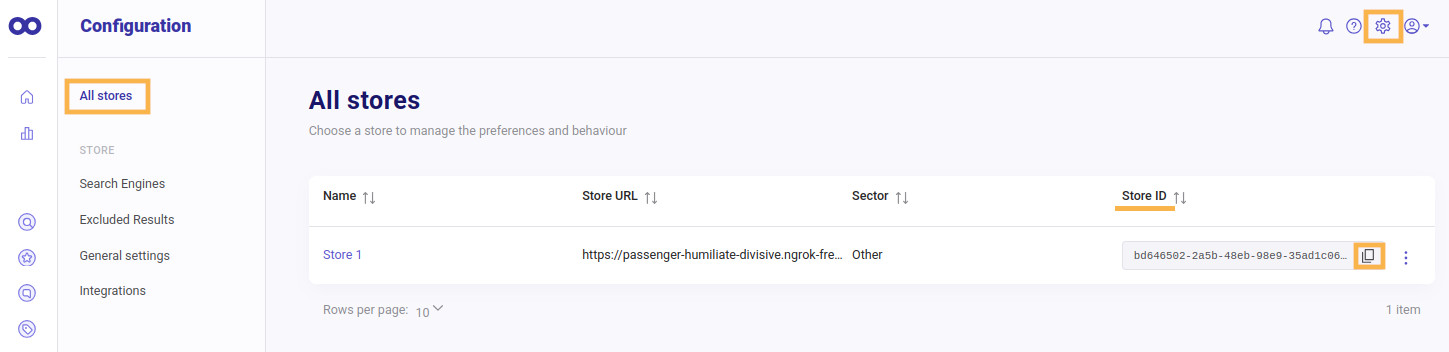
Obtaining the Store ID
-
01Log in to your Doofinder account
-
02Go to Configuration — All stores
-
03Copy the Store ID
Determining the Search Zone
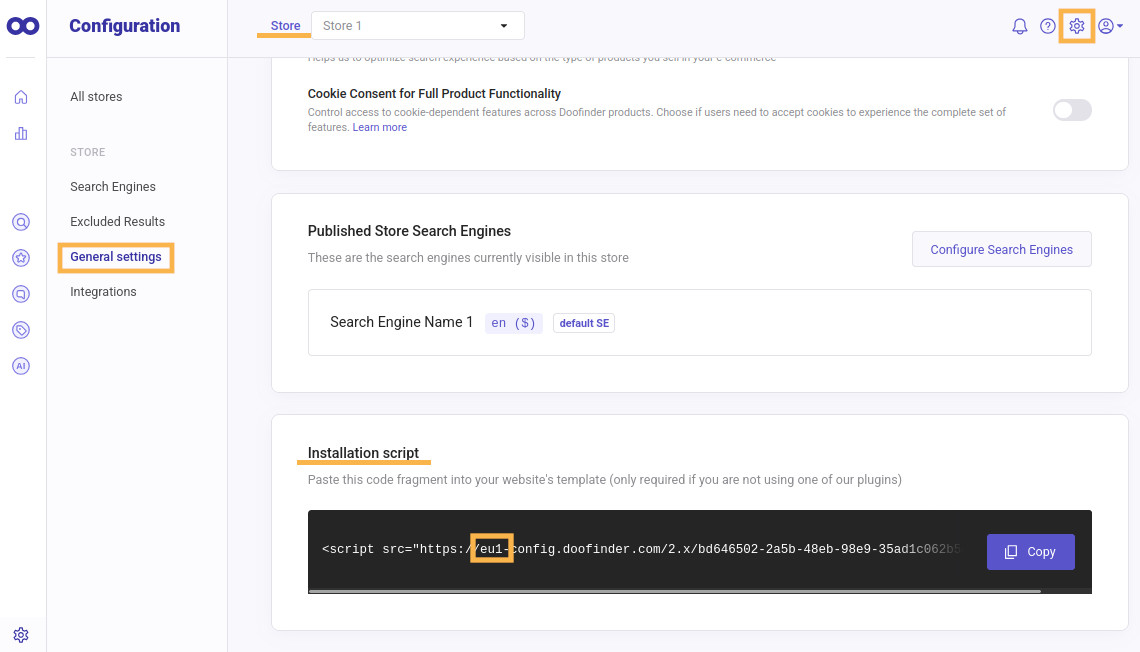
Determine the search zone according to the region where your online store operates.
-
01Open Configuration — General settings
-
02Find the Installation script section
-
03Check the script address:
eu1— Europeus1— Americaap1— Asia
Search Layer Configuration in Doofinder
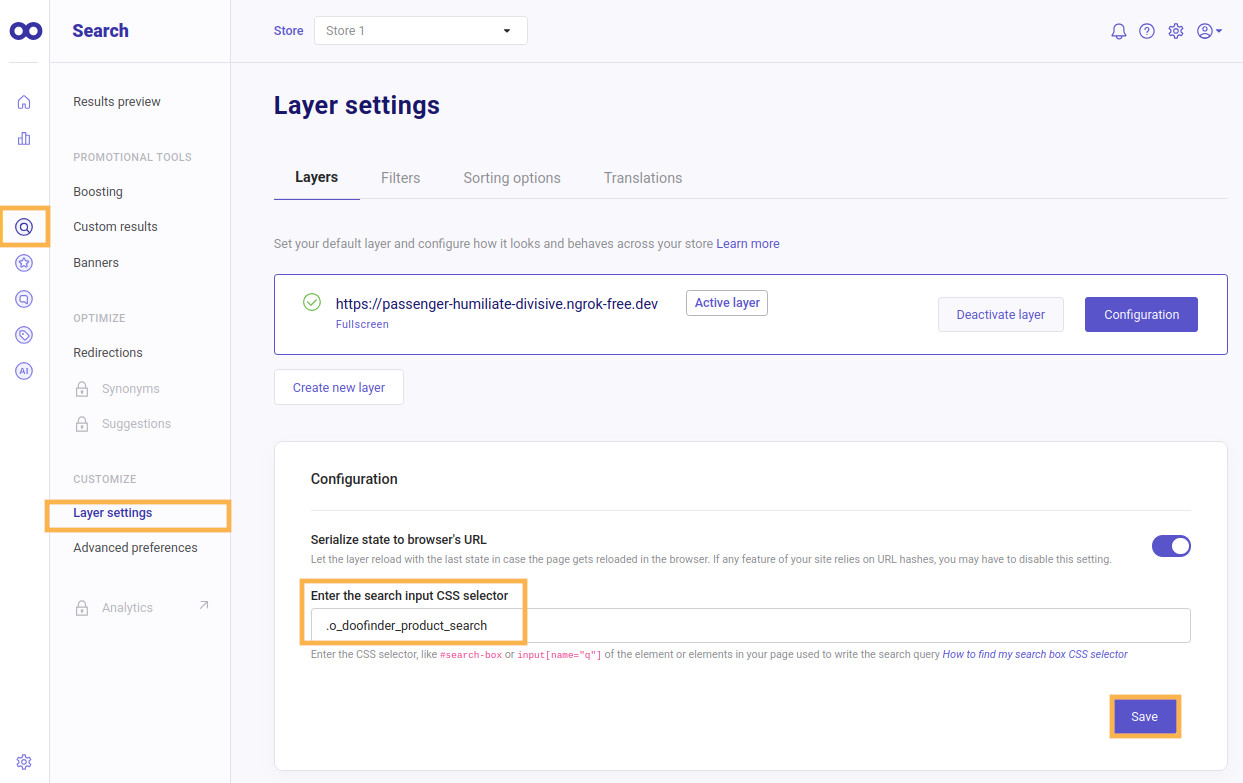
Search Layer integrates Doofinder search with your website's search field and displays results directly on your website via the Doofinder interface.
-
01Open Search — Layer Settings
-
02Copy .o_doofinder_product_search and paste it into the Enter the search input CSS selector field
-
03Click Save

Activation
Activating the Script in Odoo
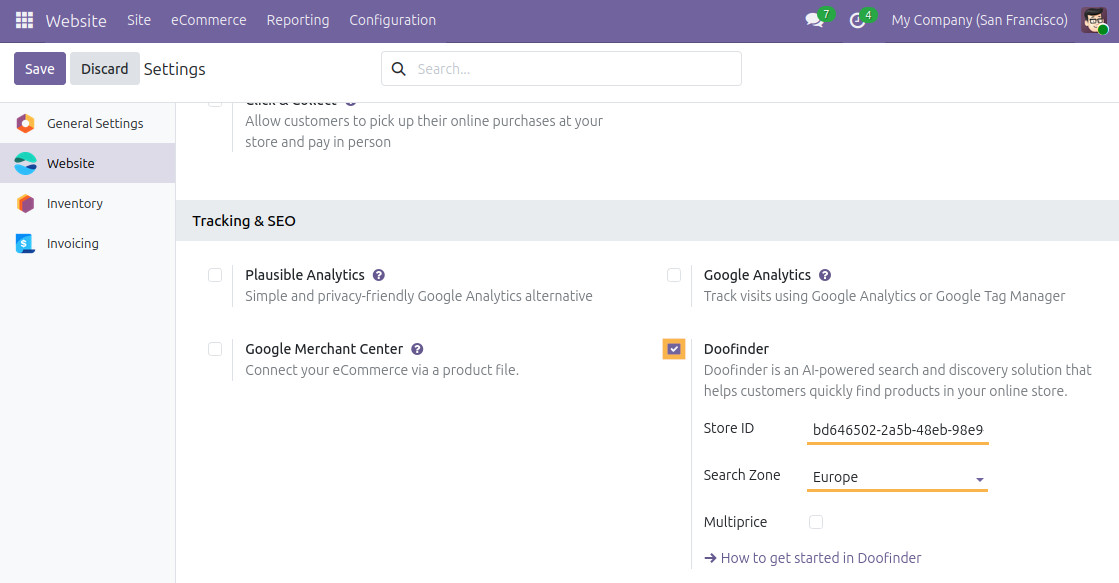
After installing the module, activate the script by completing the following steps:
-
01Go to website settings
-
02Enable the Doofinder option in the Tracking and SEO section
-
03Paste the copied store identifier into the Store ID field
-
04In the Search Zone field, select your store region
-
05Save the settings
The module then automatically adds the Doofinder script to all pages of your Odoo website.
Confirming Doofinder Code Installation
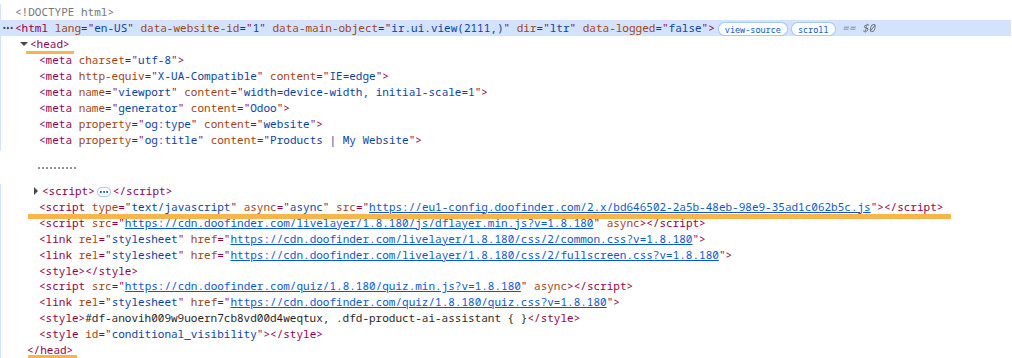
To confirm that the Doofinder code is installed on the website, open any page of your Odoo website.

Follow these steps:
-
01Right-click on the website page and select View page source
-
02Find the
andtags in the page code -
03Ensure that the Doofinder installation script is present between these tags in around the following format:


Feed Configuration
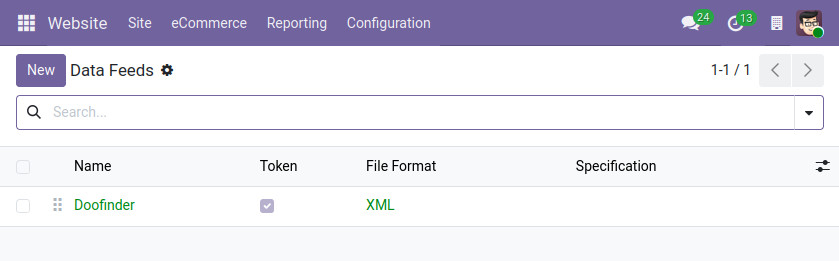
After installing the module, open the feed list to view and configure the feed according to your store's needs. Go to Website — eCommerce — Product Data Feeds.
The module comes with a ready-to-use feed template configured according to Doofinder requirements.

Specifying the Website
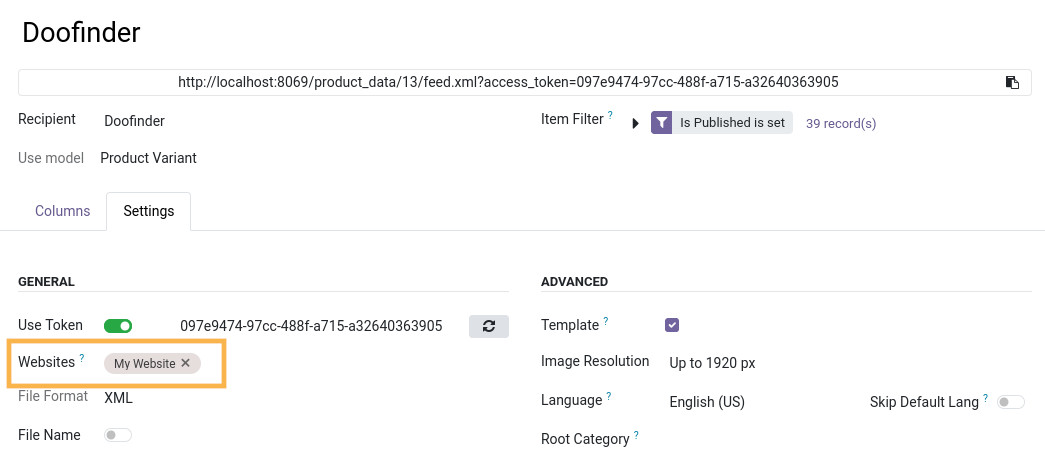
On the Feed’s Settings tab, select the website for which the Doofinder script was previously configured and connected.
Feed Products
The feed works with product variants. If a product has multiple variants, each variant is passed to Doofinder separately.
Use the Product Filter to determine which products to include in the data feed.
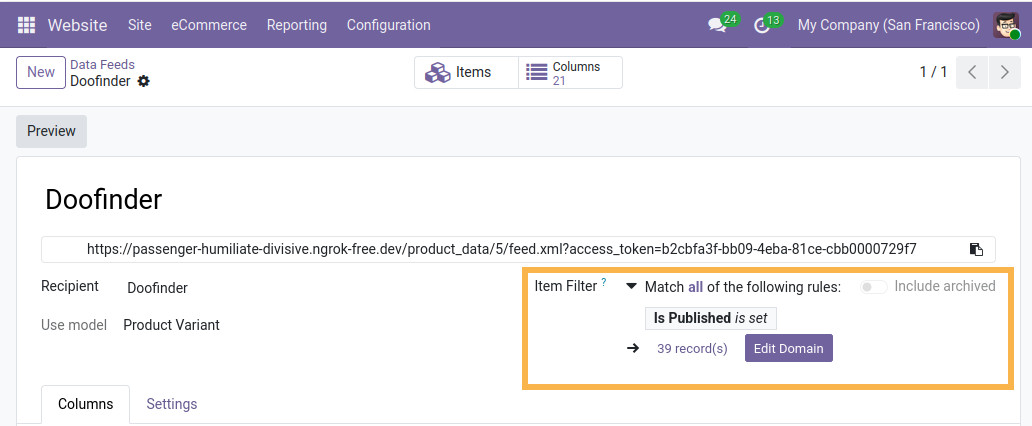
Click Edit Domain to add product filters for the data feed.
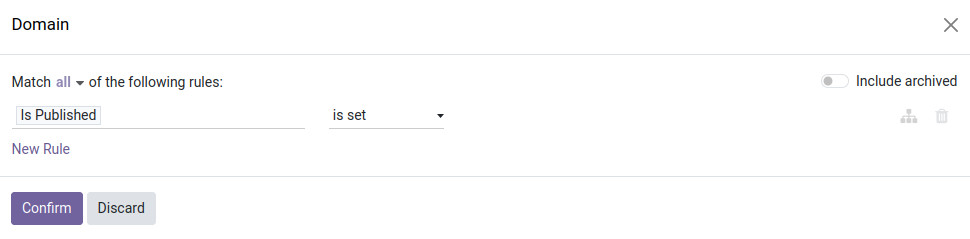
Save changes by clicking Confirm. The module automatically recalculates the number of products in the feed based on the selected filters.
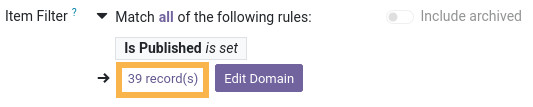
To view the list of feed products, click the link with the record count or the Items button at the top of the screen.

Stock Locations
The module allows you to select warehouses (locations) to calculate stock levels and product availability statuses.
Go to the Stock section on the data feed’s Settings tab and select the required Stock Locations.
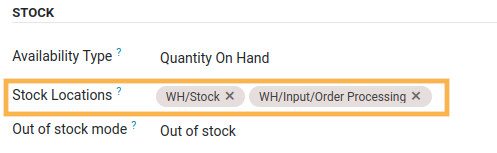
As a result, the module calculates stock levels for the data feed using only the specified locations.

Pricing Settings
Doofinder supports two pricing modes. The choice of mode depends on the combination of languages, currencies, and pricelists used in the store.
Single Price mode is designed for stores where each language version of the site uses a single currency. For each language and currency combination, a separate Search Engine is configured in the Doofinder account. Doofinder dynamically determines the required Search Engine based on the site's current language and currency.
Multiprice mode is designed for stores where a single language version of the site has multiple currencies or pricelists. In this mode, one Doofinder Search Engine is used for a single language version, storing price data for all configured currencies.
Single Price Mode Setup
Make sure the Multiprice option is disabled for Doofinder in the website settings.
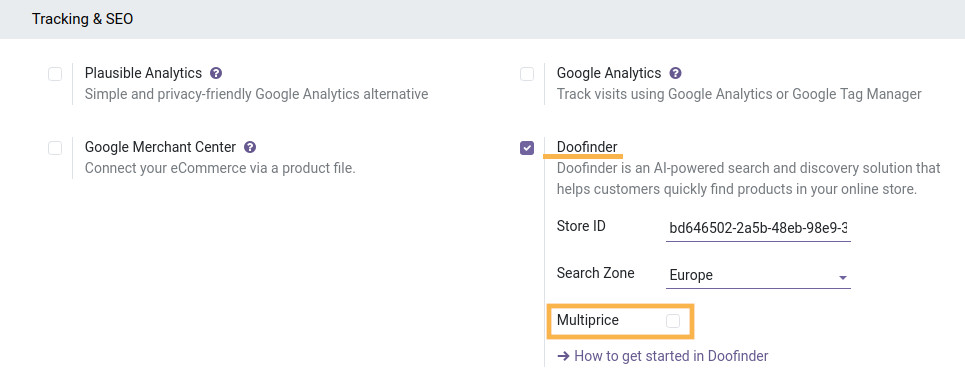
On the feed form, open the Settings tab. In the Advanced section, select the website Language if multiple language versions are available. In the Prices section, select the Pricelist corresponding to the selected website language. This pricelist is used to calculate prices.
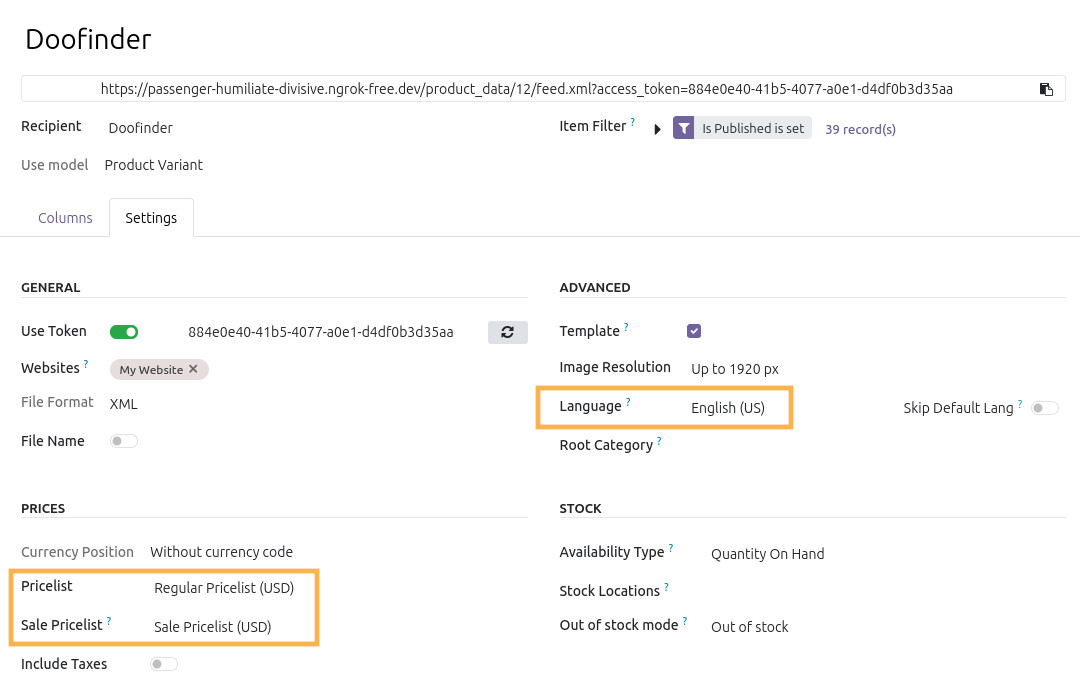
To send promotional prices via the data feed, fill in the Sale Pricelist field. Configure this pricelist in advance with lower product prices.
Multiprice Mode Setup
Enable the Multiprice option for Doofinder in the website settings.
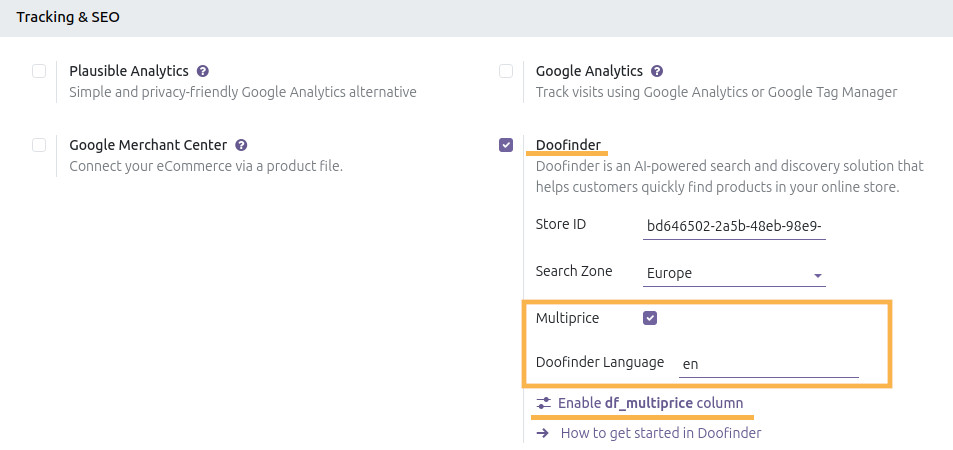
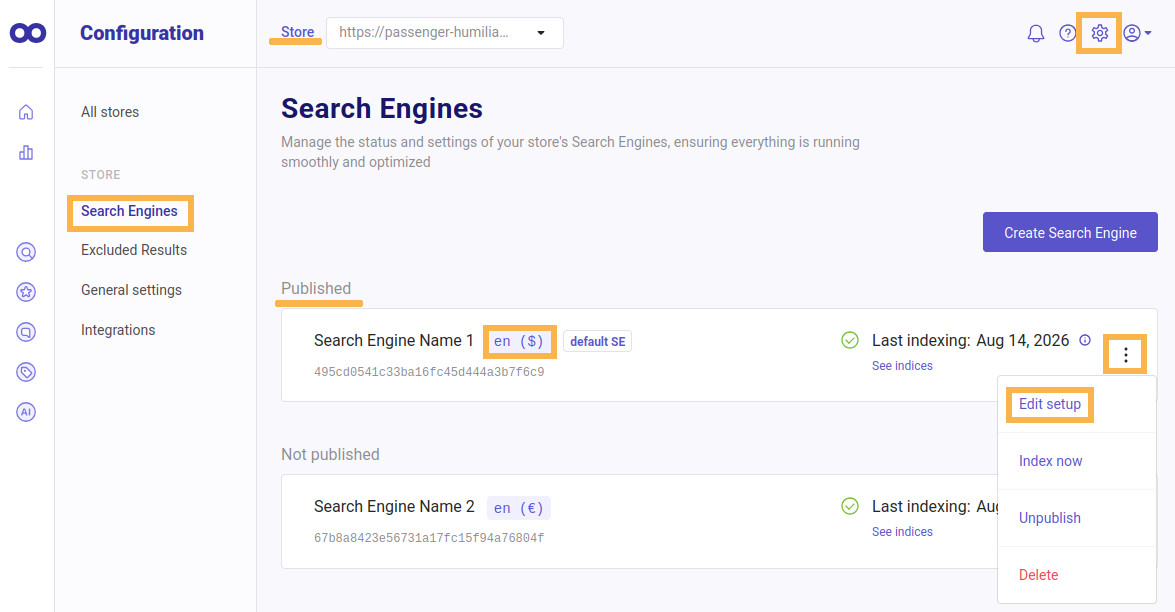
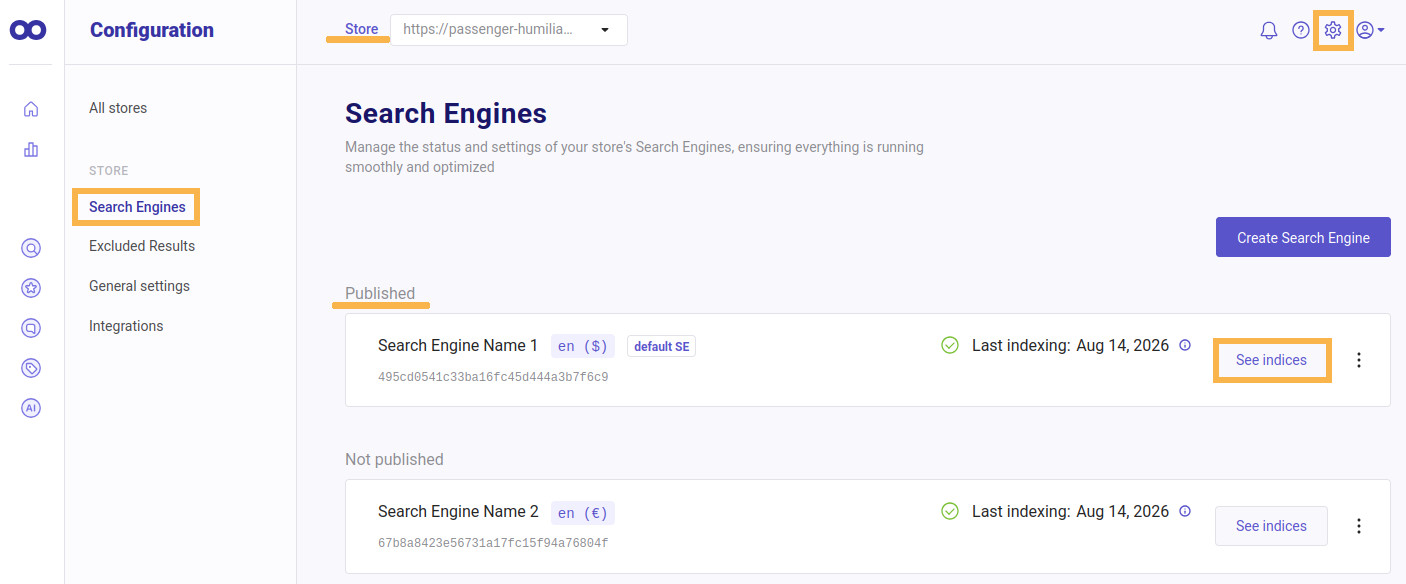
In the Doofinder Language field, enter the store language code used in the corresponding Doofinder Search Engine. You can find the language code in your Doofinder account:
-
01Log in to your Doofinder account
-
02Select the required Store at the top of the page
-
03Open Configuration
-
04Go to Search Engines
-
05Find the required Search Engine under Published
-
06Next to the Search Engine name, a label in
code(currency)format is displayed:
en— language code($)— currency
To automatically activate the df_multiprice column in all Doofinder feeds for the current website, click Enable df_multiprice column in settings. This column passes product prices in different currencies. To deactivate it, click Disable df_multiprice column.
Next, go to the feed form and open the Settings tab. In the Advanced section, select the website Language for which pricelists in different currencies are used.
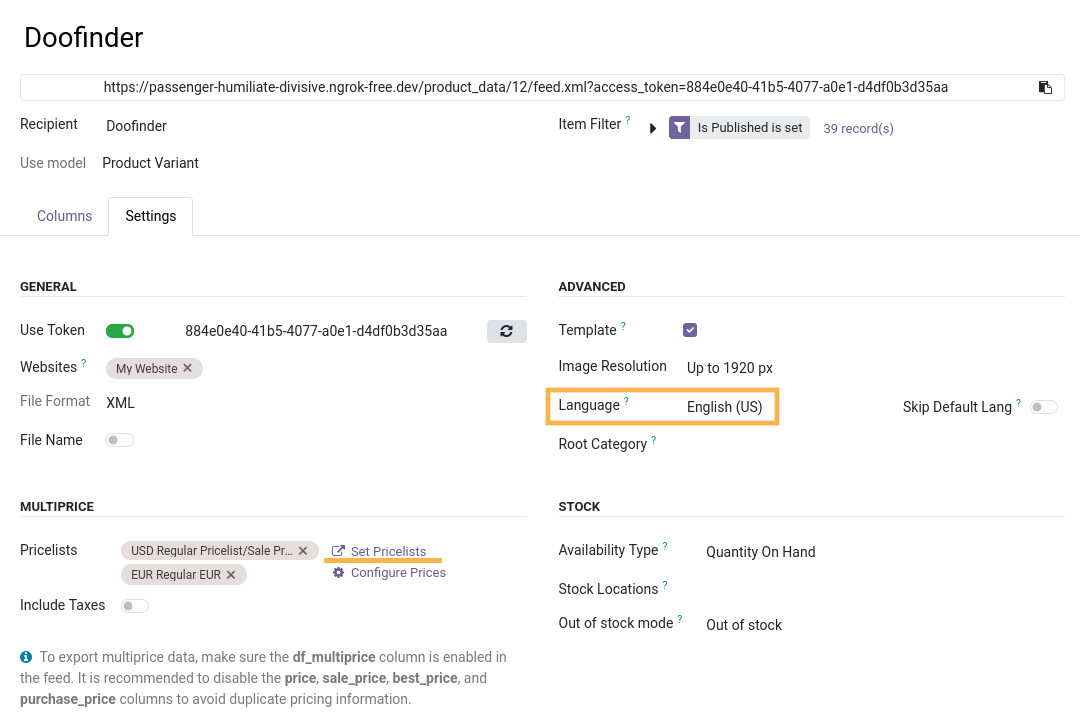
To set up pricelists for different currencies, click the Set Pricelists link in the Multiprice section.
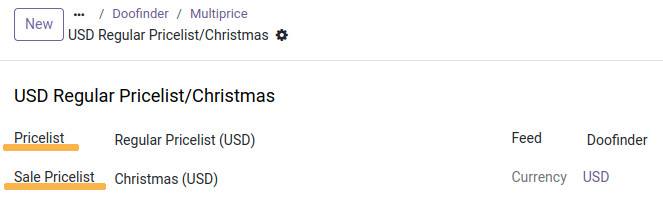
In the pop-up window, create a separate line for each currency. Specify the primary Pricelist and optionally select a Sale Pricelist.
After selecting pricelists, configure which price types to pass in the data feed for the df_multiprice column, which handles multi-currency prices in the feed. To do this, click Configure Prices in the Multiprice section and select the required price types in the pop-up window:
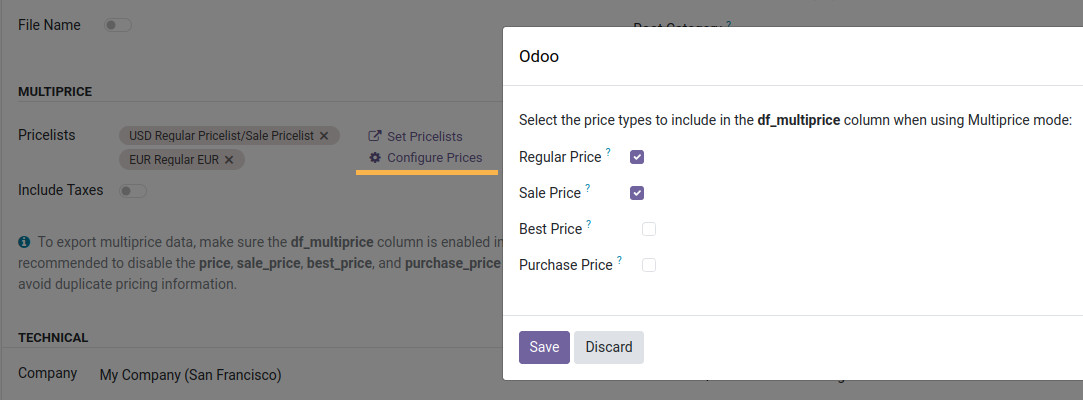
- Regular Price: Product price according to the primary pricelist
- Sale Price: Discounted product price according to the sale pricelist
- Best Price: Most favorable selling price of the product excluding taxes
- Purchase Price: Purchase price or cost price of the product
By default, Regular Price and Sale Price are selected in the feed template.

Feed Columns
The module includes data feed columns configured according to Doofinder requirements. The columns are linked to standard fields and use Odoo's base product logic. You can reconfigure feed columns through the interface by linking them to custom product fields.
To manage columns, click Columns at the top of the window.

The list of available columns is in the table below.
| Column Name | Column Description |
|---|---|
id |
Unique product identifier |
title |
Product title |
description |
Product description |
brand |
Product brand name |
category |
Product eCommerce category hierarchy |
group_id |
Product template identifier grouping all product variants |
group_leader |
Main product variant among group_id |
tags |
Product tags used for additional description, search, and filtering |
link |
URL of the product page in your Odoo online store |
image_link |
URL of the main product image |
image_links |
List of URLs for additional product images |
price |
Product price according to the pricelist or product card for Single Price mode |
sale_price |
Discounted product price according to the sale pricelist for Single Price mode |
best_price |
Most favorable selling price of the product excluding taxes for Single Price mode. Doofinder recommends passing best_price with purchase_price to determine margin and promote products |
purchase_price |
Purchase price or cost of the product for Single Price mode. Doofinder recommends passing best_price with purchase_price to determine margin and promote products |
df_multiprice |
Passes prices in Multiprice mode; when using, ensure single-price mode price columns are disabled |
availability |
Product availability status based on stock quantity |
stock_quantity |
Quantity of product in stock |
condition |
Product condition |
sku |
Unique product SKU |
gtin |
Global Trade Item Number (GTIN) |
mpn |
Manufacturer Part Number (MPN) |
Additional Attributes |
Additional product characteristics or attributes, such as material, color, size, etc. A separate column must be created for each characteristic |
The Сategory Column
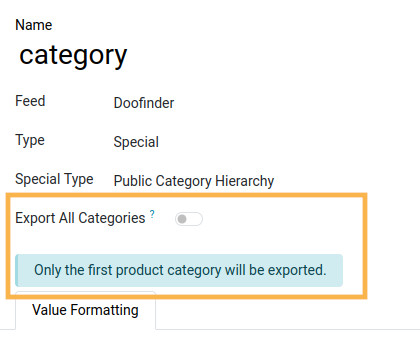
The category column defines the eCommerce product category hierarchy and allows choosing whether to send a single product category or all categories to which it belongs.
Open the category column in the available columns list. Here you can configure the Export All Categories toggle, which determines whether to send all product categories or only one.
Additional Product Attributes
You can send additional product attributes to Doofinder that do not belong to standard feed fields — for example, material, color, size, or other characteristics used in your online store.
A separate column must be created and configured for each characteristic.
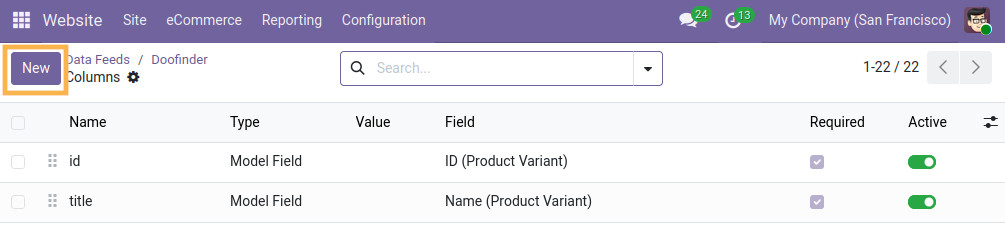
In the column list, click New to create a new column.
On the new column form, enter the column title in the Name field, select Special as Type, select Product Attribute in the Special Type field, and then choose the desired attribute from the Attribute drop-down list.
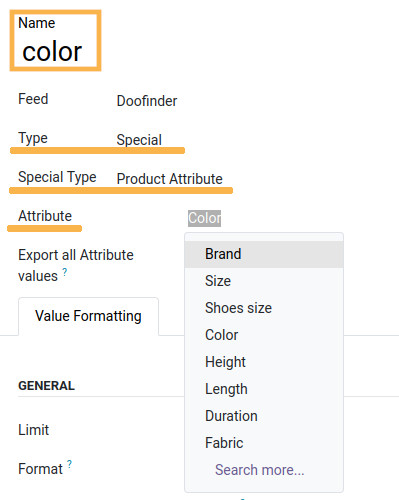
color.
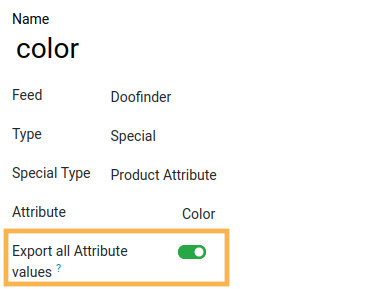
If a product has multiple values for the selected characteristic, enable Export all Attribute values to send all available values via the feed.

Product Configuration
You can configure the data feed for Doofinder at the product level. Odoo product data feed modules by Garazd Creation include extensions that allow you to enrich your products in Odoo with additional information and share it via the feed:
- Product Brands for Data Feeds — adds the ability to specify the product brand
- Number Fields for Data Feeds — adds fields for international numbers and product codes
- Product Data Feed — adds specific settings according to the analytics system or marketplace
Below are the product settings relevant to Doofinder.
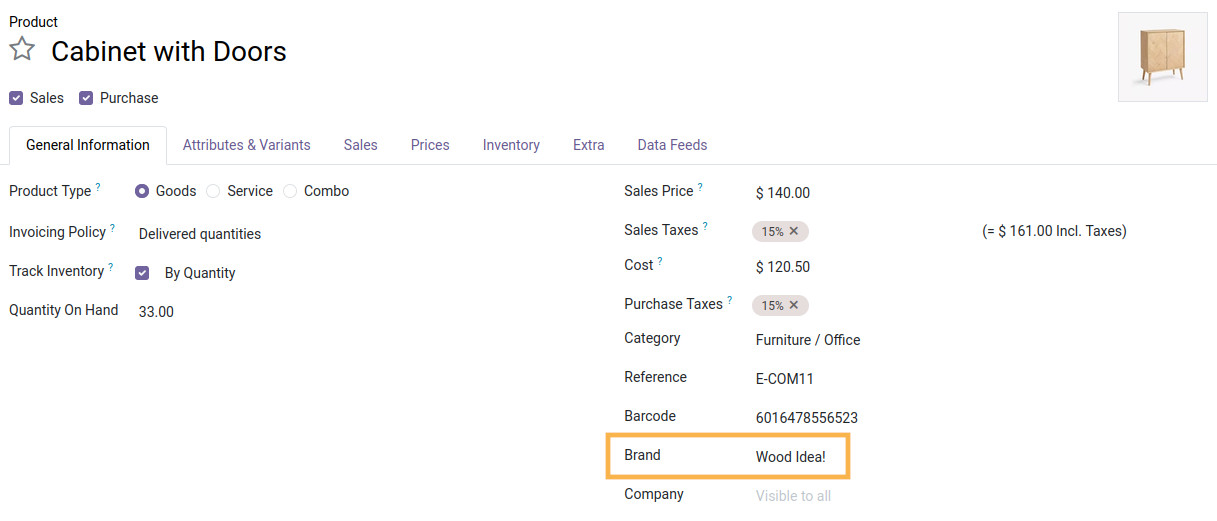
Brand
To specify a brand, open a product on the General Information tab and fill in the Brand field.
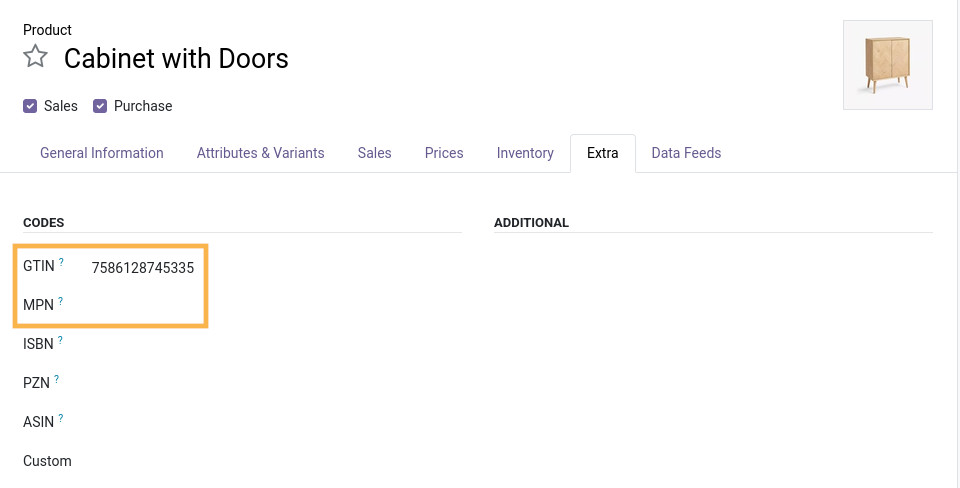
Codes
Specify product codes, such as GTIN and MPN, on the Extra tab in the Codes section.

Connecting the Feed
To connect a data feed to Doofinder, you need a configured data feed and a Doofinder account.
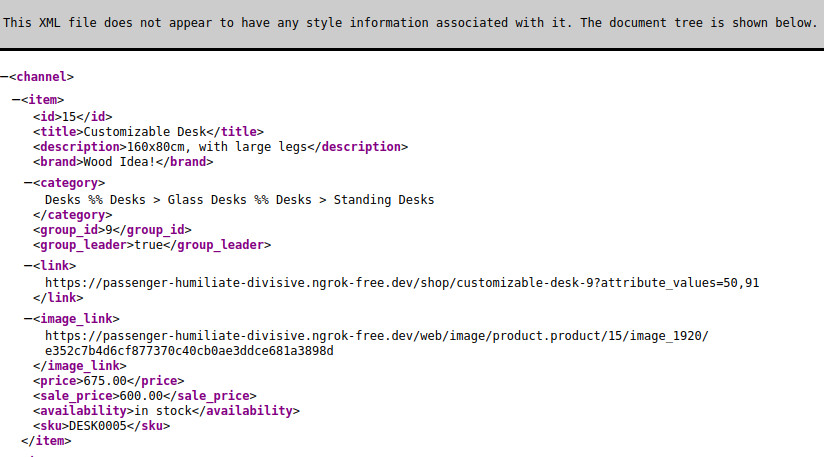
Feed Preview
Before connecting the data feed to Doofinder, click Preview to view the configuration result.

Generated feed preview:
How to Connect the Feed to Doofinder
To add a product feed to your Doofinder account, first copy the URL of the required data feed in Odoo.

In your Doofinder account, select the required Store at the top of the page. Go to Configuration — Search Engines, find the required Search Engine in the Published list, and select See indices.
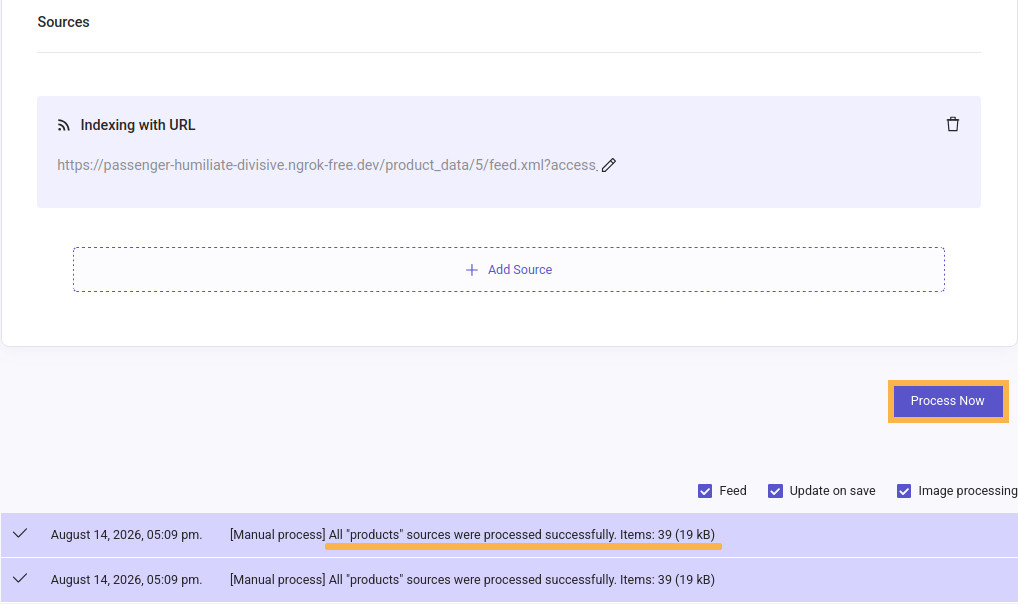
Follow these steps:
-
01Click Add Source
-
02Paste the copied feed URL into the field and click Add
-
03Click Process Now
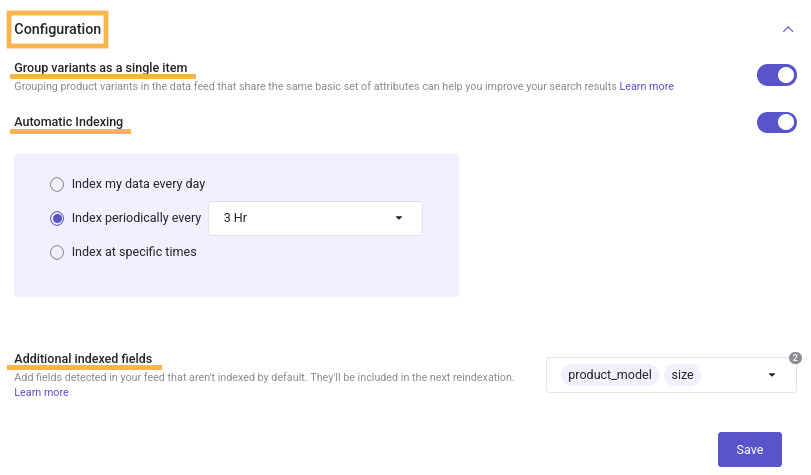
On the same page below, in the Configuration section:
- Configure automatic update frequency
- Enable Group variants as a single item if using group_id and group_leader
- If needed, add feed fields that are not indexed by default under Additional indexed fields
Results Preview
You can use Results Preview to test the Search Engine and verify how Doofinder displays products from your feed taking into account transmitted columns. To do this, go to Admin Panel — Search.
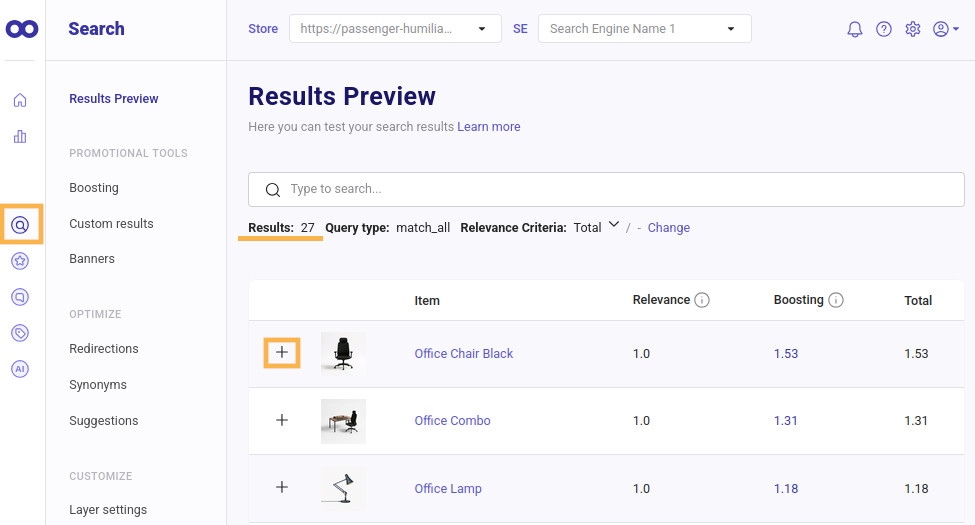
The number of displayed products may be smaller than the total feed count if Group variants as a single item is enabled—in this case, variants of a single product are grouped and shown as one item.
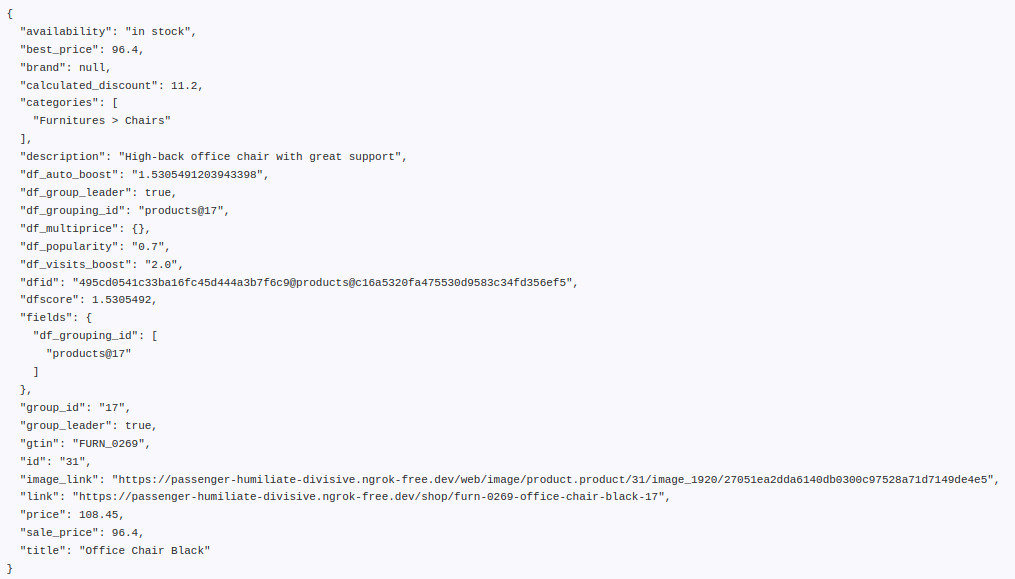
Click + to expand detailed product information and check the fields and values sent in the feed.
Changelog
19.0.1.0.0 2026-08-17
- Init version.
Resources



How to Automate Your Launch on Europe’s Leading Marketplace