Initial server configuring
Let's consider the process to deploy Odoo 16.0 for production purposes on Ubuntu 22.04 Server. We carry out all the settings on a clean, newly created server.
SSH settings
Install the openssh package by running the command:
sudo apt-get install openssh-server
Next, modify your SSH configuration file to improve security:
sudo nano /etc/ssh/sshd_config
change the port number from the standard 22 to another in the range above of 1000:
Port 22
prohibit connection to the server by SSH using the root login:
PermitRootLogin no
prohibit connection to the server using passwords, to achieve this, comment out this line:
PasswordAuthentication no
allow ssh connection only to certain users (add a line to the bottom of the file):
AllowUsers user1 user2
allow SSH connections only from certain IP addresses:
AllowUsers = *@123.123.123.123
# Allow access only for IP 123.123.123.123
Generate a pair of SSH keys on your local computer (if they have not been generated before):
ssh-keygen -t rsa -b 4096
Add public keys to access the server without entering a password:
On a local computer, copy a public key to the clipboard
cat ~/.ssh/id_rsa.pub

On the server, paste from the clipboard and save the file
nano ~/.ssh/authorized_keys && chmod 600 ~/.ssh/authorized_keys

After making the changes, restart the SSH service with the command
sudo /etc/init.d/ssh reload
Open a new terminal (without closing the current one) and try to connect to the server via SSH. If the connection fails, check everything again and make the necessary changes through the first terminal.
Install and setup Docker
Run the following commands to perform system update:
sudo apt-get update
sudo apt-get upgrade -y
The following commands will install docker on your system:
sudo apt-get install -y apt-transport-https ca-certificates curl software-properties-common
UBUNTU_RLS=$(lsb_release -rs)
if [[ ${UBUNTU_RLS:0:2} -le 21 ]] ; then
   curl -fsSL https://download.docker.com/linux/ubuntu/gpg | sudo apt-key add -
   sudo add-apt-repository "deb [arch=amd64] https://download.docker.com/linux/ubuntu $(lsb_release -cs) stable"
else
   curl -fsSL https://download.docker.com/linux/ubuntu/gpg | sudo gpg --dearmor -o /usr/share/keyrings/docker-archive-keyring.gpg
   echo "deb [arch=$(dpkg --print-architecture) signed-by=/usr/share/keyrings/docker-archive-keyring.gpg] https://download.docker.com/linux/ubuntu $(lsb_release -cs) stable" | sudo tee /etc/apt/sources.list.d/docker.list > /dev/null
fi
sudo apt update
apt-cache policy docker-ce
sudo apt install -y docker-ce docker-compose
Let's check the status of Docker installation:
sudo systemctl status docker
Add the current user to the docker group:
sudo usermod -aG docker $(whoami)
Let's create a directory for Odoo docker containers:
sudo mkdir /opt/docker
sudo chown -R $(whoami): /opt/docker
Moving on now ... create a directory structure for a separate project and give it a name, for example, "test":
mkdir /opt/docker/test
mkdir /opt/docker/test/config
mkdir /opt/docker/test/addons
mkdir /opt/docker/test/addons/custom
mkdir /opt/docker/test/backups
mkdir /opt/docker/test/build
mkdir /opt/docker/test/logs
mkdir /opt/docker/test/geoip
Next, we will create the Odoo configuration file "odoo.conf":
nano /opt/docker/test/config/odoo.conf
Add the following text to the file:
[options]
admin_passwd = MASTER_PASS
xmlrpc_port = 8069
db_user = odoo
db_password = odoo
addons_path=
dbfilter = ^%d$
list_db = True
log_db_level = warning
log_handler = :INFO
log_level = debug_rpc
logfile = /mnt/logs/odoo-server.log
logrotate = False
limit_time_cpu = 120
limit_time_real = 180
limit_time_real_cron = 0
max_cron_threads = 2
proxy_mode = True
workers = 3
The generation of a strong master password can be performed as follows:
python3 -c 'import base64, os; print(base64.b64encode(os.urandom(72)))'
Paste the generated password in the configuration file into the admin_passwd parameter.
Creating the "docker-compose" file
Now, create the configuration file "docker-compose.yml" with the command:
nano /opt/docker/test/docker-compose.yml
Add the following text to the configuration file:
version: "2"
services:
  web:
    build: ./build
    depends_on:
      - db
    restart: unless-stopped
    ports:
      - "127.0.0.1:18069:8069"
      - "127.0.0.1:18072:8072"
    volumes:
      - odoo-web-data:/var/lib/odoo
      - ./config:/etc/odoo
      - ./addons:/mnt/extra-addons
      - ./backups:/mnt/backups
      - ./logs:/mnt/logs
      - ./geoip:/usr/share/GeoIP/
    # command: -u all -d test
    networks:
      - test
  db:
    image: postgres:12
    restart: unless-stopped
    command: postgres -c "max_connections=300"
    environment:
      - POSTGRES_DB=postgres
      - POSTGRES_PASSWORD=odoo
      - POSTGRES_USER=odoo
      - PGDATA=/var/lib/postgresql/data/pgdata
    volumes:
      - odoo-db-data:/var/lib/postgresql/data/pgdata
    logging:
      options:
        max-size: 50m
    networks:
      - test
volumes:
  odoo-web-data:
  odoo-db-data:
networks:
   test:
Creating the "Dockerfile" configuration file
First, look up your current Linux user ID as follows:
sudo grep "^$(whoami):" /etc/passwd | cut -f 3 -d:
1000
In the similar way, we get the user's group ID:
sudo grep "^$(whoami):" /etc/passwd | cut -f 4 -d:
1000
Add the file to create the Odoo container:
nano /opt/docker/test/build/Dockerfile
Place the following text to the Dockerfile:
FROM odoo:16.0
USER root
RUN usermod -u 1000 odoo
RUN groupmod -g 1000 odoo
RUN mkdir /var/lib/odoo/.local
RUN chown -R 1000:1000 /var/lib/odoo
RUN pip3 install --upgrade pip
# Adding additional python libraries is as follows:
# Python dependency for installing the "auto_backup" module
RUN pip3 install paramiko
# After adding a new line, the container needs to be rebuilt with the command: docker-compose down && docker-compose up -d –-build
USER odoo
Let's try to run the container:
cd /opt/docker/test
docker-compose up -d
The process of uploading images and creating a container for the current project will begin. Once these processes are complete, the docker container will be launched. You can view the Odoo log using the following command:
tail -f /opt/docker/test/logs/odoo-server.log
If the container was created successfully, stop the container with the command:
docker-compose down
Configuring NGINX and Certbot
Steps to take before you start setting up
Before setting up the NGINX configuration, you need to create a domain for the Odoo system, we will take the following domain name as an example: test.domain.com
In a domain control panel of your domain name registration service, add a record of type A for the domain (subdomain) and specify the IP address of your server:

test.
NGINX Installation
To install NGINX, run the command:
sudo apt-get install -y nginx
Installing Certbot
Install Certbot with the following commands:
sudo apt install snapd -y
sudo snap install certbot --classic
The next steps will include:
creating an NGINX configuration to obtain an SSL certificate for the domain;
making the configuration changes necessary to launch the Odoo system with a domain name.
Creating a NGINX configuration file
Let's create an NGINX configuration file for the domain "test.domain.com":
sudo nano /etc/nginx/sites-available/test.domain.com.conf
First, let's add the following text to it for receiving an SSL certificate:
server {
   listen [::]:80;
   listen 80;
   server_name test.domain.com www.test.domain.com;
 }
Let's activate this configuration by creating a symlink - a link to the file in the "/etc/nginx/sites-enabled" directory:
sudo ln -s /etc/nginx/sites-available/test.domain.com.conf /etc/nginx/sites-enabled/test.domain.com.conf
Then we will test that the configuration is correct:
sudo nginx -t
Restart the NGINX service if there are no errors:
sudo nginx -s reload
Obtaining an SSL certificate
Next, we will get a certificate for our domain "test.domain.com" by this command:
sudo certbot -m "admin@domain.com" -d "test.domain.com" --non-interactive --agree-tos --nginx certonly
The result is:
Saving debug log to /var/log/letsencrypt/letsencrypt.log
Requesting a certificate for test.domain.com

Successfully received certificate.
Certificate is saved at: /etc/letsencrypt/live/test.domain.com/fullchain.pem
Key is saved at:         /etc/letsencrypt/live/test.domain.com/privkey.pem
This certificate expires on 2023-09-24.
These files will be updated when the certificate renews.
Certbot has set up a scheduled task to automatically renew this certificate in the background.

- - - - - - - - - - - - - - - - - - - - - - - - - - - - - - - - - - - - - - - -
If you like Certbot, please consider supporting our work by:
 * Donating to ISRG / Let's Encrypt:   https://letsencrypt.org/donate
 * Donating to EFF:                    https://eff.org/donate-le
- - - - - - - - - - - - - - - - - - - - - - - - - - - - - - - - - - - - - - - -
Let's change the NGINX configuration settings for use with the Odoo system:
sudo nano /etc/nginx/sites-available/test.domain.com.conf
We will use the following data if we are installing Odoo version 16 or higher:
map $http_upgrade $connection_upgrade {
  default upgrade;
  ''      close;
}
#odoo server
upstream odoo_test {
   server 127.0.0.1:18069;
}
upstream odoochat_test {
   server 127.0.0.1:18072;
}

server {
   listen [::]:80;
   listen 80;
   server_name test.domain.com www.test.domain.com;
   return 301 https://test.domain.com;
 }

server {
   listen [::]:443 ssl;
   listen 443 ssl;

   server_name www.test.domain.com;

   ssl_certificate /etc/letsencrypt/live/test.domain.com/fullchain.pem;
   ssl_certificate_key /etc/letsencrypt/live/test.domain.com/privkey.pem;

   return 301 https://test.domain.com;
}

server {
   listen [::]:443 ssl http2;
   listen 443 ssl http2;

   server_name test.domain.com;

   ssl_certificate /etc/letsencrypt/live/test.domain.com/fullchain.pem;
   ssl_certificate_key /etc/letsencrypt/live/test.domain.com/privkey.pem;

   # log
   access_log /var/log/nginx/test.domain.com.access.log;
   error_log /var/log/nginx/test.domain.com.error.log;

   proxy_read_timeout 720s;
   proxy_connect_timeout 720s;
   proxy_send_timeout 720s;

   # Redirect longpoll requests to odoo websocket port
   location /websocket {
      proxy_pass http://odoochat_test;
      proxy_set_header Upgrade $http_upgrade;
      proxy_set_header Connection $connection_upgrade;
      proxy_set_header X-Forwarded-Host $host;
      proxy_set_header X-Forwarded-For $proxy_add_x_forwarded_for;
      proxy_set_header X-Forwarded-Proto $scheme;
      proxy_set_header X-Real-IP $remote_addr;
   }

   # Redirect requests to odoo backend server
   location / {
      # Add Headers for odoo proxy mode
      proxy_set_header X-Forwarded-Host $host;
      proxy_set_header X-Forwarded-For $proxy_add_x_forwarded_for;
      proxy_set_header X-Forwarded-Proto $scheme;
      proxy_set_header X-Real-IP $remote_addr;
      proxy_redirect off;
      proxy_pass http://odoo_test;
      client_max_body_size 512M;
   }

   location ~* /web/static/ {
      proxy_cache_valid 200 90m;
      proxy_buffering on;
      expires 864000;
      proxy_pass http://odoo_test;
   }

   location ~* /web/database/manager {
      allow 123.123.123.123;
      deny all;
      proxy_pass http://odoo_test;
   }

   location ~* /web/database/selector {
      allow 123.123.123.123;
      deny all;
      proxy_pass http://odoo_test;
   }

   # common gzip
   gzip_types text/css text/scss text/plain text/xml application/xml application/json application/javascript;
   gzip on;
}
Data for Odoo version 15 or lower:
#odoo server
upstream odoo_test {
   server 127.0.0.1:18069;
}
upstream odoochat_test {
   server 127.0.0.1:18072;
}

server {
   listen [::]:80;
   listen 80;
   server_name test.domain.com www.test.domain.com;
   return 301 https://test.domain.com;
 }

server {
   listen [::]:443 ssl;
   listen 443 ssl;

   server_name www.test.domain.com;

   ssl_certificate /etc/letsencrypt/live/test.domain.com/fullchain.pem;
   ssl_certificate_key /etc/letsencrypt/live/test.domain.com/privkey.pem;

   return 301 https://test.domain.com;
}

server {
   listen [::]:443 ssl http2;
   listen 443 ssl http2;

   server_name test.domain.com;

   ssl_certificate /etc/letsencrypt/live/test.domain.com/fullchain.pem;
   ssl_certificate_key /etc/letsencrypt/live/test.domain.com/privkey.pem;

   # log
   access_log /var/log/nginx/test.domain.com.access.log;
   error_log /var/log/nginx/test.domain.com.error.log;

   proxy_read_timeout 720s;
   proxy_connect_timeout 720s;
   proxy_send_timeout 720s;

   # Add Headers for odoo proxy mode
   proxy_set_header X-Forwarded-Host $host;
   proxy_set_header X-Forwarded-For $proxy_add_x_forwarded_for;
   proxy_set_header X-Forwarded-Proto $scheme;
   proxy_set_header X-Real-IP $remote_addr;

   # Redirect longpoll requests to odoo longpolling port
   location /longpolling {
      proxy_pass http://odoochat_test;
   }

   # Redirect requests to odoo backend server
   location / {
      proxy_redirect off;
      proxy_pass http://odoo_test;
      client_max_body_size 512M;
   }

   location ~* /web/static/ {
      proxy_cache_valid 200 90m;
      proxy_buffering on;
      expires 864000;
      proxy_pass http://odoo_test;
   }

   location ~* /web/database/manager {
      # allow 121.121.121.121;
      # deny all;
      proxy_pass http://odoo_test;
   }

   location ~* /web/database/selector {
      # allow 121.121.121.121;
      # deny all;
      proxy_pass http://odoo_test;
   }

   # common gzip
   gzip_types text/css text/scss text/plain text/xml application/xml application/json application/javascript;
   gzip on;
}
Test that the configuration is correct and restart the NGINX service if there are no errors:
sudo nginx -t && sudo nginx -s reload
Adding third-party modules
To connect third-party Odoo modules, go to the "addons" directory and clone a required repository:
cd /opt/docker/test/addons
For a sample, let's copy the standard Odoo themes for a website by the following command:
git clone -b 16.0 --single-branch --depth=1 https://github.com/odoo/design-themes
The modules with Odoo website themes will be added to the /opt/docker/test/addons/design-themes directory, then you need to add this path to the Odoo configuration file to the "addons_path" parameter as follows:
nano /opt/docker/test/config/odoo.conf
Add the path to the modules:
addons_path=/mnt/extra-addons/design-themes
Let's restart the docker container with these commands:
cd /opt/docker/test && docker-compose down && docker-compose up -d
In the same way, we will add other repositories and modules we need, for example, a backup module:
cd /opt/docker/test/addons && git clone -b 16.0 --single-branch --depth=1 https://github.com/Yenthe666/auto_backup.git
Add the path to the modules to the configuration file:
addons_path=/mnt/extra-addons/design-themes
    ,/mnt/extra-addons/auto_backup
Creating a database
After connecting the additional modules, open the project domain name https://test.domain.com in your browser.
If the previous steps were completed successfully, you will be redirected to the page for creating a new database.
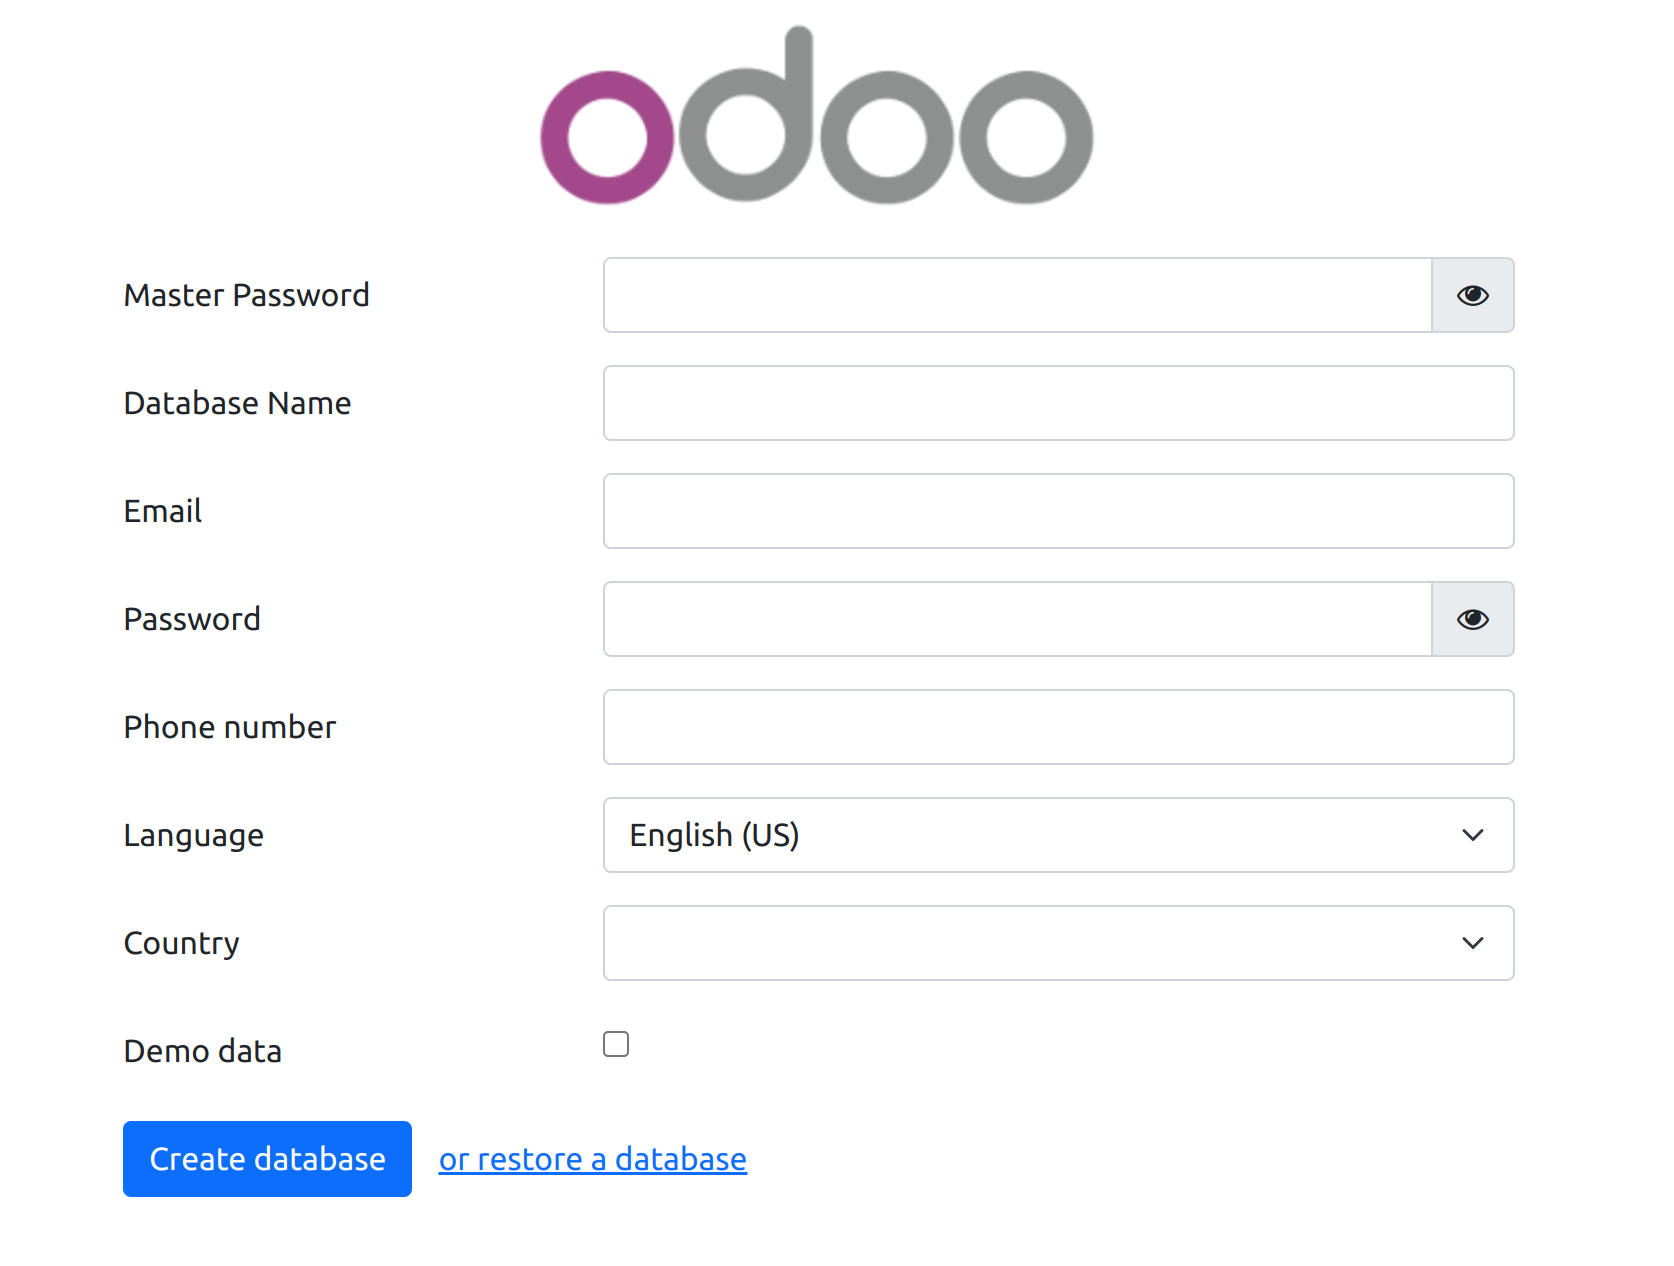
To create a database, fill in the fields:
Master Password - password from the Odoo configuration file (parameter "admin_passwd").
Database Name - must match the name of the project, in our case it is "test".
Email - e-mail address or login of the system administrator.
Password - administrator password, it is advisable to use complex, long passwords. To generate a complex password of 50 characters, you can use the command:
pwgen -N 1 -s 50 -y.Language - the main language that will be activated when creating the database.
Country - the country that will be selected for the created company in the system.
Demo data - this option should be activated only if you are creating a database for demonstration purposes. Usually, this option is not activated for production systems.
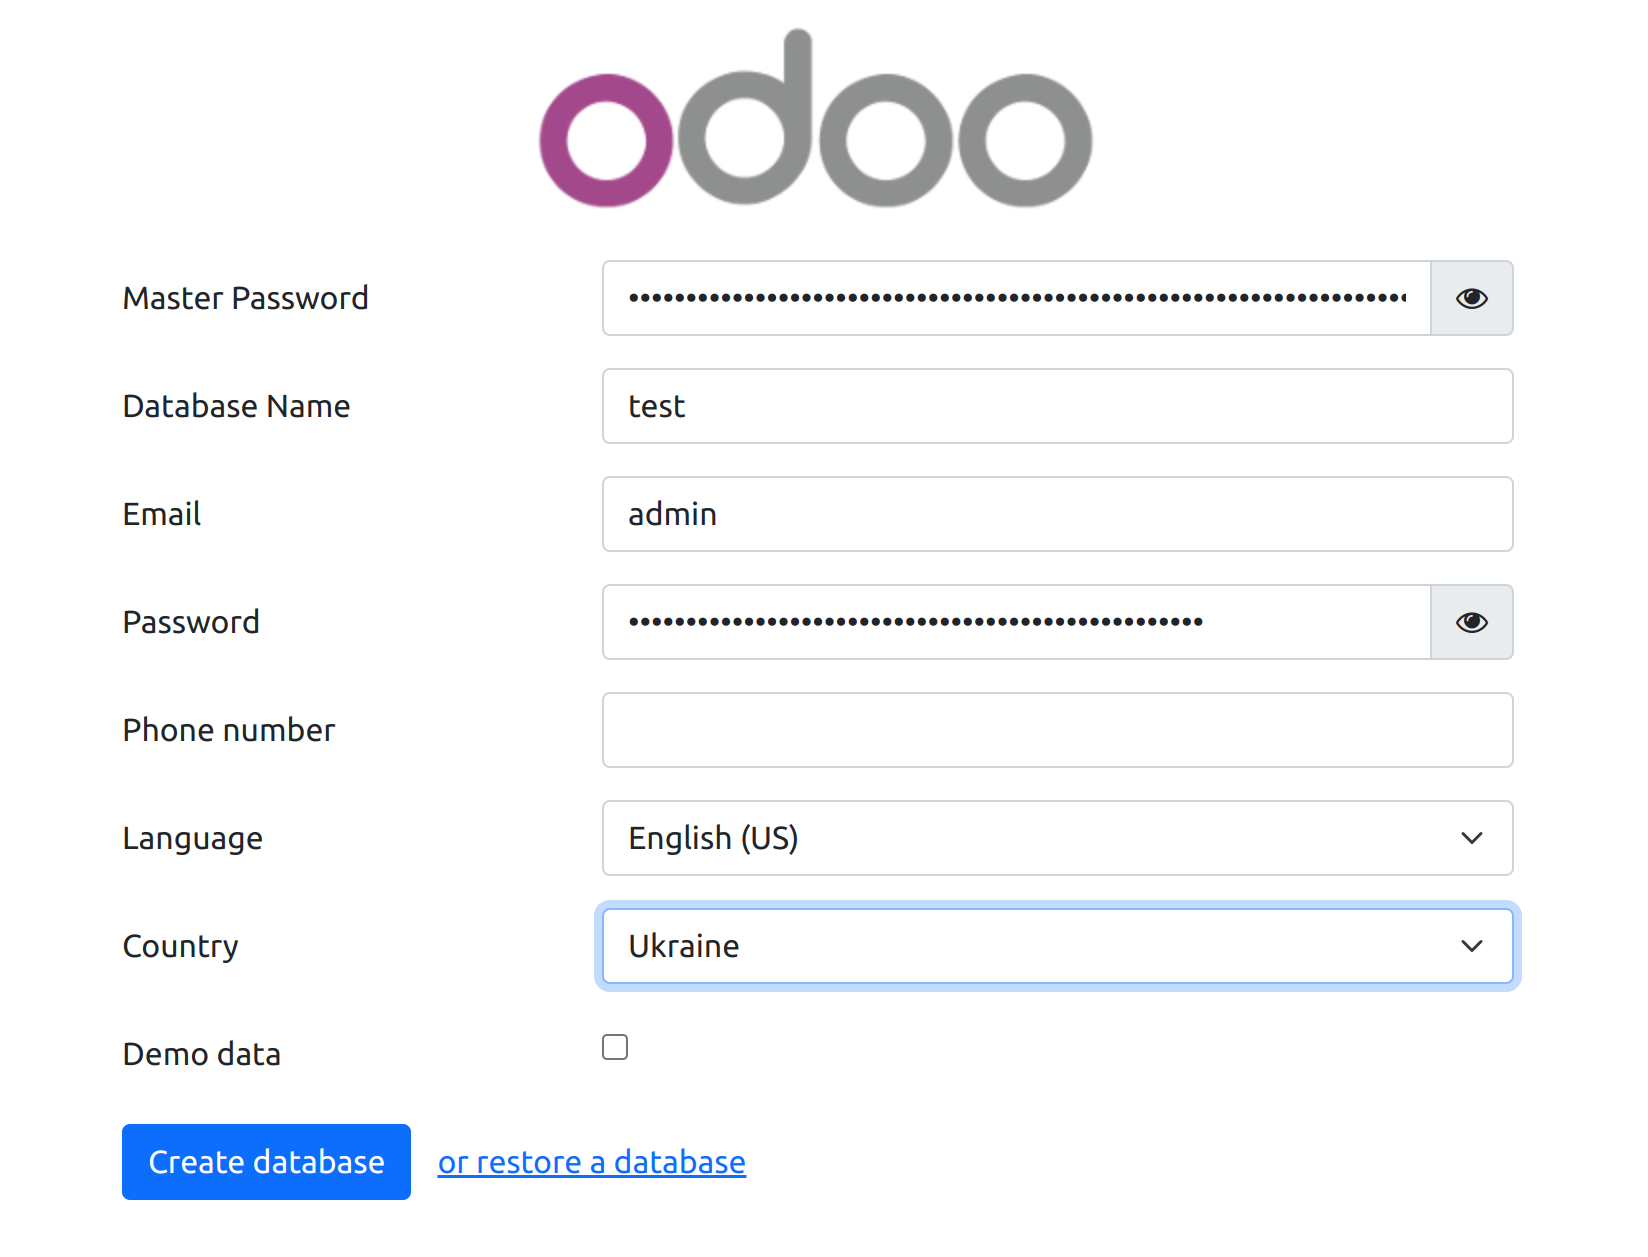
After filling in all the required fields, click on "Create database".
Setting up a backup
For automatic database backup, we use the Odoo module from Yenthe666 available on the GitHub https://github.com/Yenthe666/auto_backup.git repository.
Connect the repository as described in the section Adding third-party modules, then log in and activate the developer mode to continue by the following steps.

Install the Database auto-backup / auto_backup module and go to the menu Settings - Technical - Back-ups - Configure back-ups.
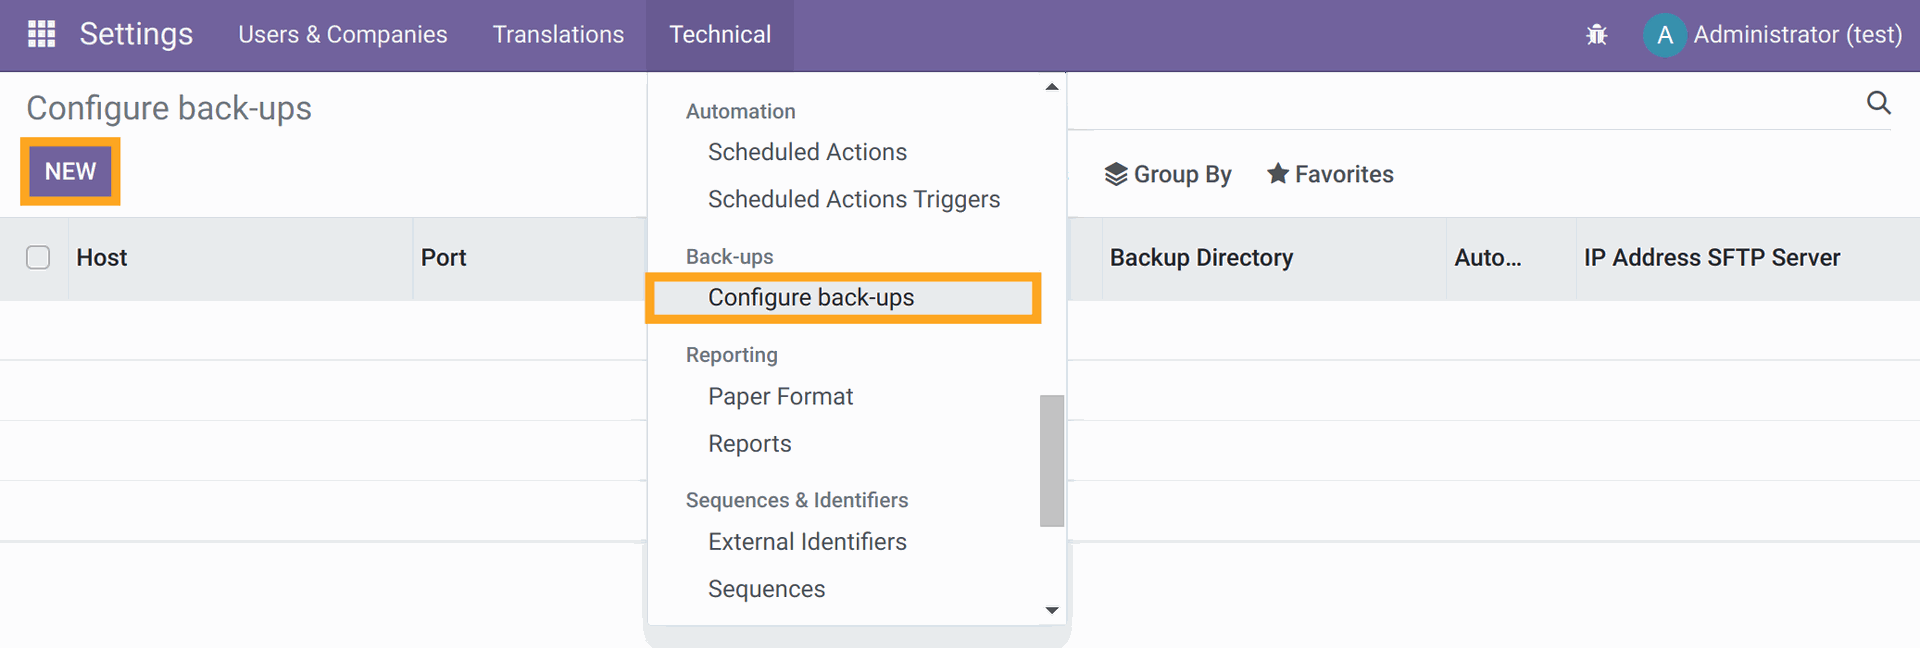
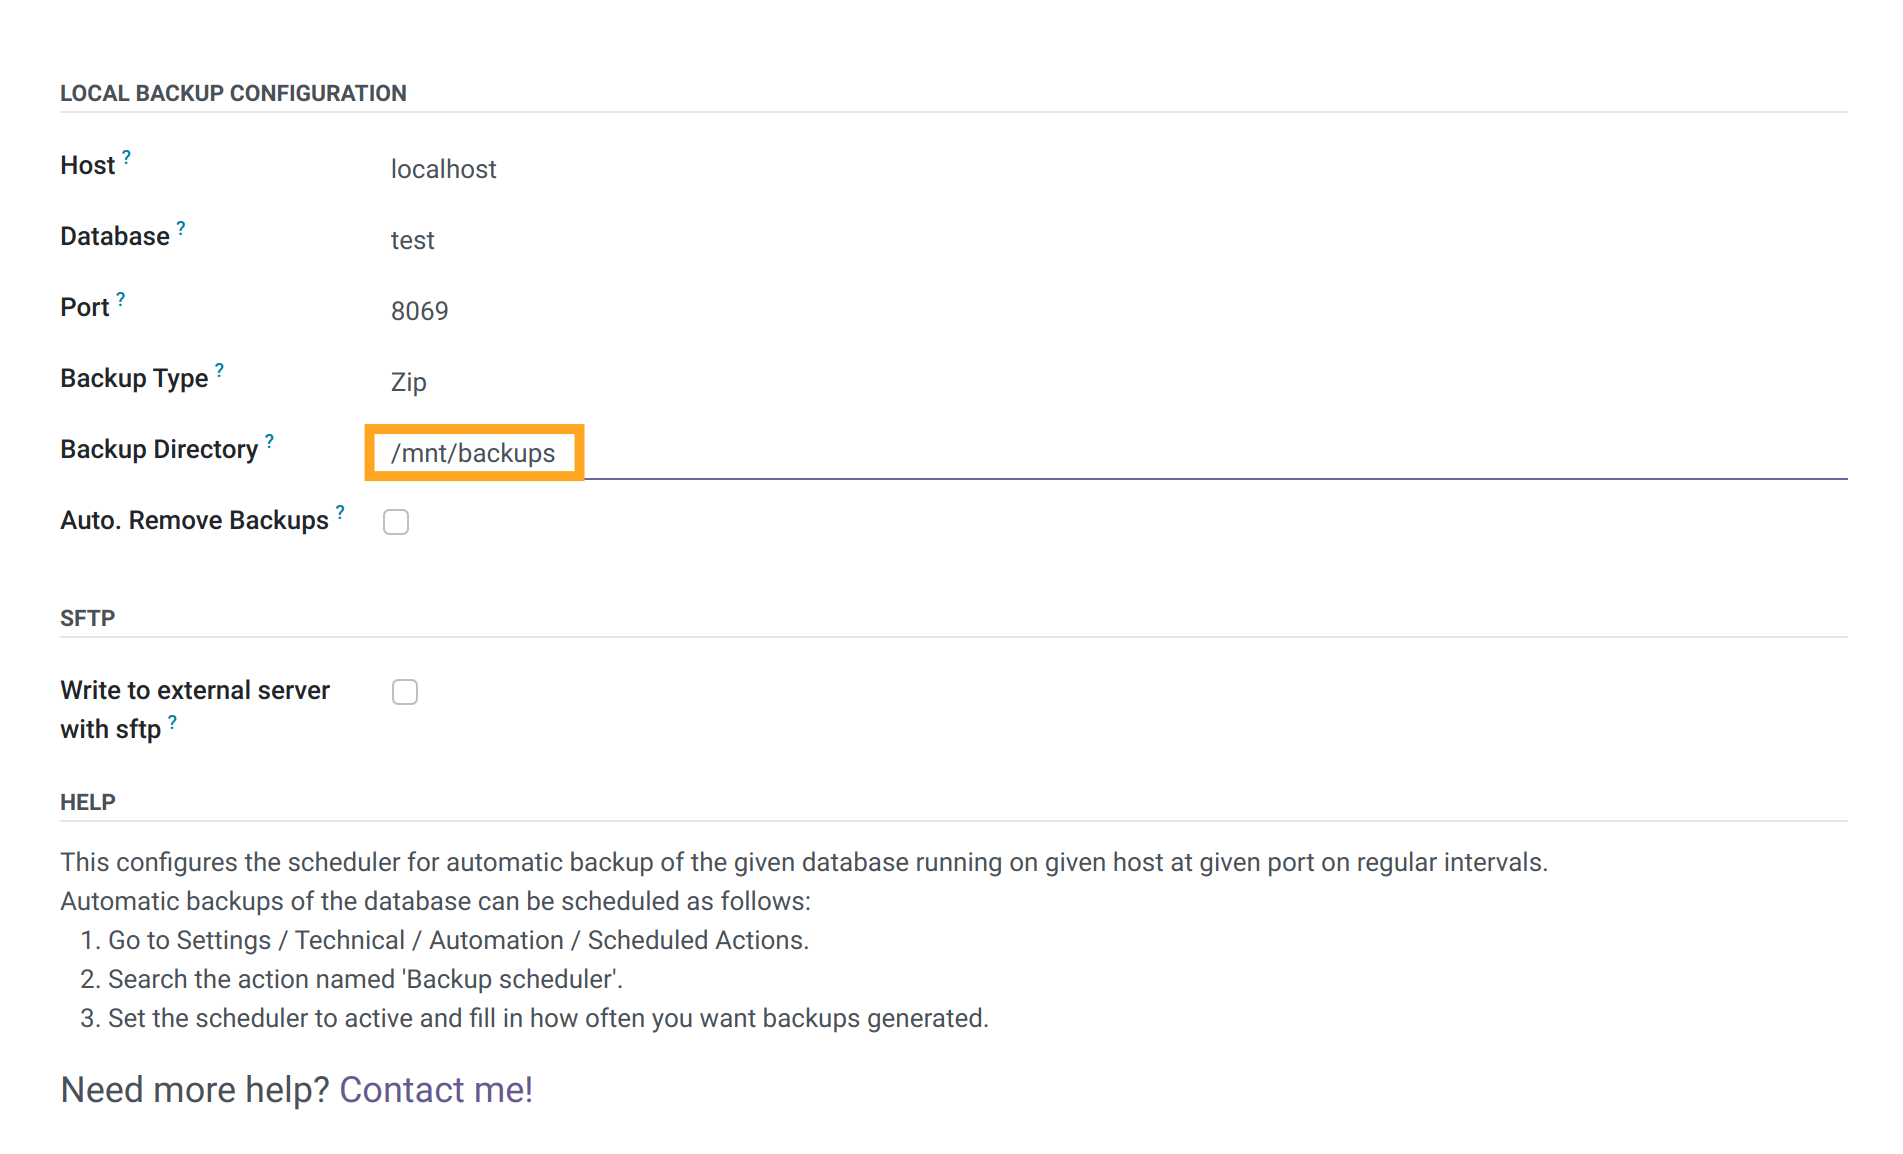
Create a new configuration by clicking on "New". Leave all the values that were added by default, except for the Backup Directory parameter, it needs to be set to the following value: /mnt/backups
The next step is to activate the Backup scheduler background task in the menu Settings - Technical - Automation - Scheduled Actions.
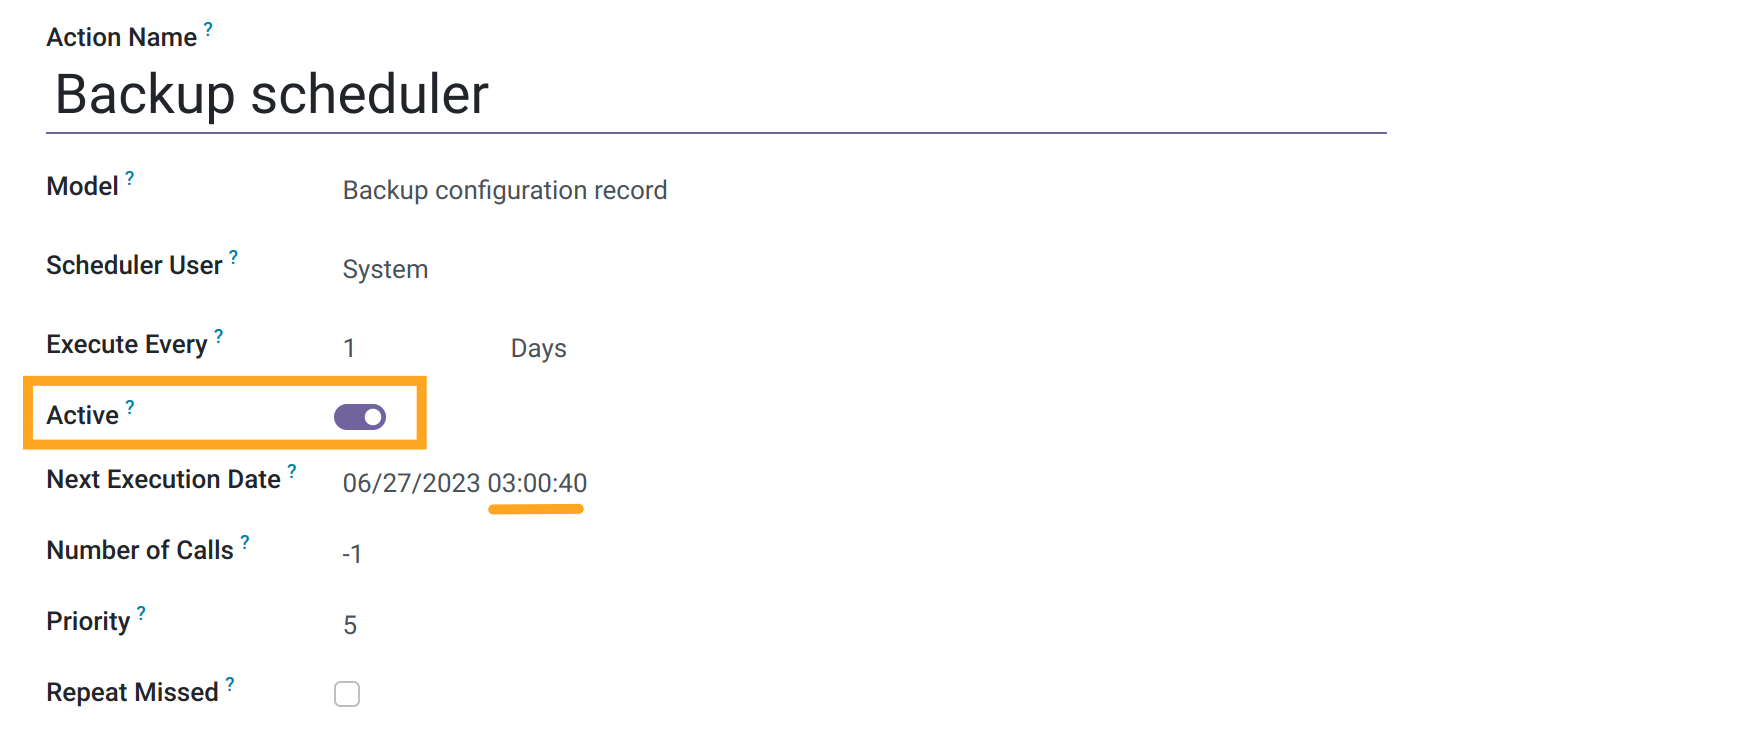
Also, specify the time when the database should be backed up. By default, the backup takes place once a day.

To check the correctness of the settings, click on "Run Manually". A copy of the database will be created and saved by the path /opt/docker/test/backups